Getting Started
Welcome you, the new Javatar! I will take you through a simple project to help using Javatar faster and better suit your workflow.
This should take some time since I am going to explain everything you might need to know. But in a normal work, you would do all of this in a few minutes.
At the end of this chapter, we will see a simple application that takes our input and responds to us.
If you are ready, let’s begin!
Startup
Javatar is designed to be ready out of the box. At startup, Javatar will load their snippets, packages and check for any available Additional Packages and later, you might see a notification display some important update messages.

If you run Javatar for the first time, it also download and install necessary packages (Java SE) for you too.

Usually, you can use Javatar right away when you open Sublime Text since most users did not create a new class or organize imports at startup time.
Preparing Our New Project
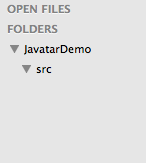
To prepare our project, we need to create a folder to contain our files then open it in Sublime Text and do not forget to create src folder to store our Java source code.
First Command
Let’s try working with a command. First, we need to create a new package to test some Java code.
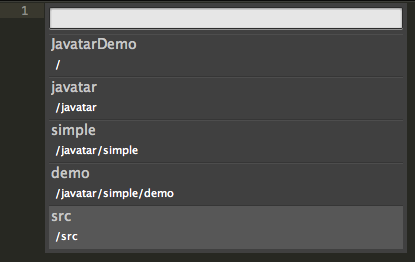
We will pressing Key+Shift+K twice to open Javatar‘s menu and select Create... > Package to open up an input box.

Note
Key is Control on Windows, Linux and Command on OS X.
Then type javatar.simple.demo and hit Enter or Return.

And there it is! Our first package.
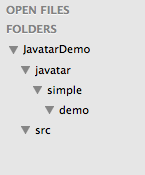
But unfortunately, our package is ends up in a wrong place.
We want our package to be created inside src folder.
Why is that? There is a reason...
Source Folder
The reason that our package is ending up in a wrong place because we did not set the source folder yet.
What is a source folder? Source folder is, obviously, a folder which contains source code files.
Since, we want our source code to be placed in src folder. Hence, the src folder should be set as source folder as the name stated.
To set a source folder, we will run a command Set Source Folder.
We will pressing Key+Shift+K twice again to open Javatar‘s menu and select Project Settings... > Set Source Folder
Then we will select src folder as we want.
Warning
If project data restoration feature is disabled and you did not save your project, Source Folder and Dependencies settings might be reset when you restarted Sublime Text.
Menu is Everything
As you can see, Javatar use menus instead of Command Palette to help group commands to a single submenu. This helps find commands easier when you do not know which command you are looking for.
And also Sublime Text did not support dynamic Command Palette since Javatar need to add or remove an action from snippets, packages or your project’s dependencies list.
First Class
After we set a source folder, it is time to recreate that package again (do not forget to remove an old one too!) but since we are going to create a class later, we will try a faster command that lets us create both package and class at the same time.
Press Key+Shift+K twice and select Create... > Class and it will wait for us to enter a class name.
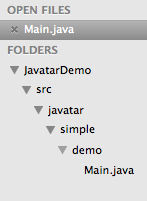
Enter javatar.simple.demo.Main and hit Enter or Return to create it.
And bam! A class is created inside a proper package path. Isn’t that great?
So, Create Package command is useless? Well, not so much. Sometimes, you might need to creates a package before create a class to organize packages, and later you will fill it up with a bunch of classes. And that is the time when Create Package comes in.
Package Path
Right now, if you look at a status bar at the bottom of the window, you will notice that there is a package path showing. This will change when you switch to another tab that is Java file, indicated which package current file is in.

Coding Time!
It is a fun time! Let’s code a simple application that takes our name and display “Hello, <Name>!”
package javatar.simple.demo;

import java.util.Scanner;

public class Main {
        public static void main(String[] args) {
                Scanner sc = new Scanner(System.in);
                System.out.print("Hey! What's your name: ");
                String name = sc.nextLine();
                System.out.println("Hello, " + name + "!");
        }
}
Build Our Project
We have just done our first Java coding. Let’s build and run it!
Select Builds... > Project from the menu and wait...

If something is wrong, Javatar will show you in a new view.
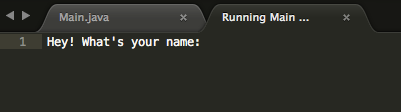
Running Our Code
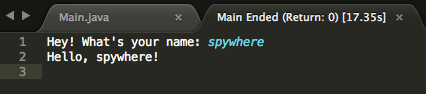
It is time to test our application. To run just select Builds... > Run Main Class and Javatar will launch our application on a new view.
If application exit properly, Javatar will show return code in a tab. But if you want to force quit an application, just close the view and an application will be terminated.
Final
And you just learn most parts of Javatar by now. Explore it! Try download some packages if you need!
And Happy Coding!